TIG Welding or Gas Tungsten Arc Welding (GTAW) is a commonly used welding process that is used when high quality, clean and precise welds are required.
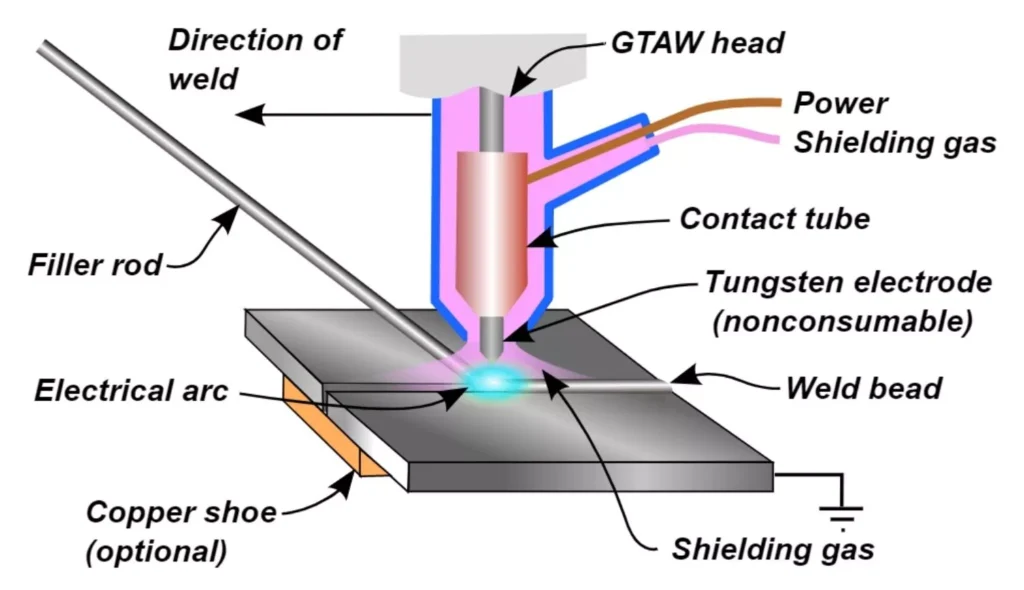
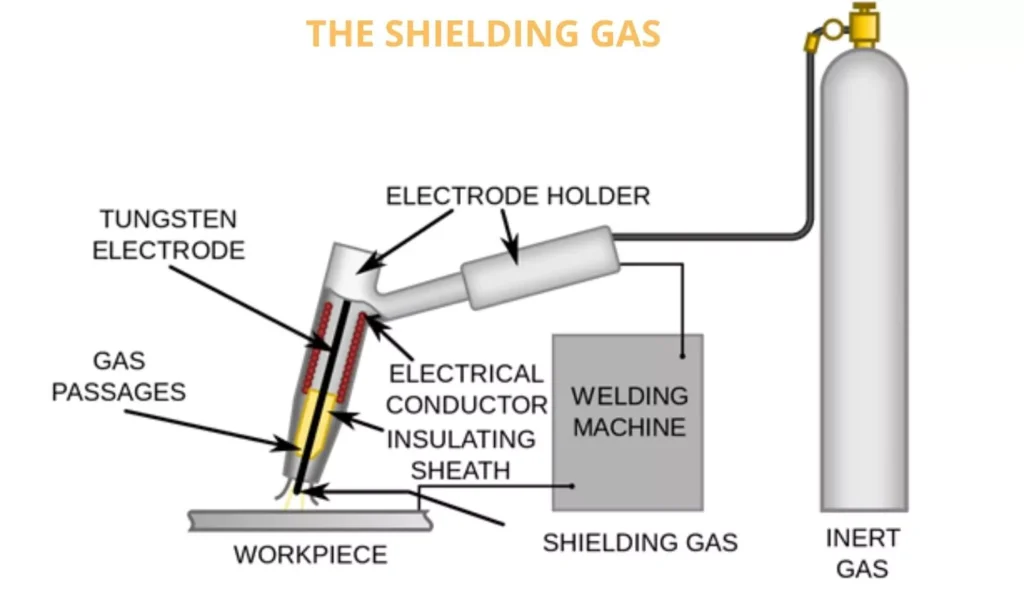
TIG welding occurs when an arc is created between a non-consumable tungsten electrode and the workpiece metal. A gas called shielding gas is fed through the torch which surrounds the tungsten electrode, protecting it from contamination.
The welder presses a foot pedal to control the amount of current. The filler metal is a wire that is dipped into the weld pool by hand to fill the joint. There is no excess spatter because you only feed in the filler metal that is required, there is no flux and there are no splatters because you only push it into place.
Pros of TIG welding:
- Less spatter
- Low distortion
- High weld quality and precise welds, you get a much greater level of control.
Cons of TIG welding:
- More dexterity required
- Slow welding speed because the filler deposition rate is low
- High operating costs
TIG Welding Setup
See below how to get set up ready for TIG welding.
To start, you’ll need to get your torch set up. A TIG torch body needs four main components and a tungsten electrode for set-up. The torch body holds the collet, collet body, back cap, and cup. These components are what hold the electrode in place and help distribute the shielding gas. To match your tungsten electrode with your torch supply company’s specifications, you’ll need a collet that’s right for your machine’s size; a collet can be as small as 1/8″ or as large as 1/2″.
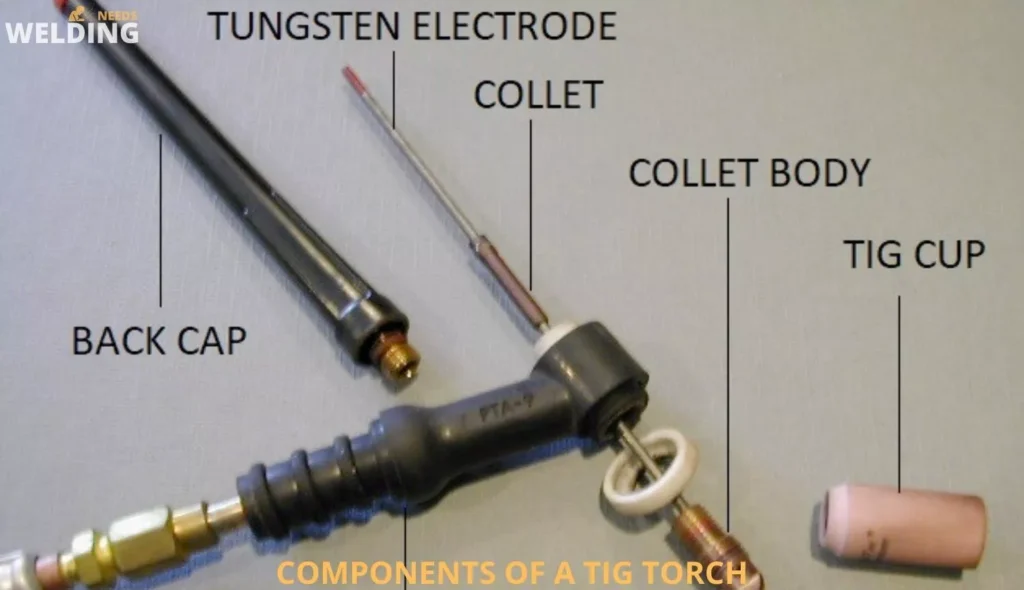
Collet Body
The collet body screws in to the TIG gun, holding the electrode in place and distributing shielding gas. It slides into the back and a gas cup is added on the front.
Collet
The collet holds the tungsten electrode and securely connects it to the TIG torch. The collet needs to be the same size as the diameter of the tungsten electrode, or else it won’t transfer current smoothly from the torch into the electrode.
TIG Cup
The TIG cup determines how much shielding gas is distributed to the weld pool. The cup size is chosen based on the size of the joint that will be welded. The diameter of the cup also affects the angle at which you can hold the torch. Each TIG cup has a number assigned to it, which corresponds to its diameter.
Size 4: 4/16 inside diameter
Size 5: 5/16 inside diameter
Size 6: 6/16 inside diameter
Size 7: 7/16 inside diameter
Tungsten Electrode
The tungsten electrode is not consumed during welding, it channels the amperage and creates the arc. It is held in the gun with the collet which is screwed into the gun.
The electrode of a DC TIG welder contains different coloured bands depending on what you are welding. The most common coloured electrode for steel is red 2% thoriated, but it’s not suitable for aluminum. For AC aluminum, there’s green which is pure tungsten. Purple is OK for steel and aluminum.
Before welding, grind your tungsten tig to a point. If the tungsten tig touches the workpiece it will ruin your tip and you will need to grind it again before continuing to weld. The tip should be very close to the workpiece but not touch it.
Electrodes come in different diameters: 1/16”, 3/32” and 1/8″. The diameter of this will need to match the filler rod diameter.
The electrode and filler rod diameter will depend on how much filler metal you want to me deposited into the weld pool.
Electrode Stickout
When you insert the electrode into a TIG torch, you’ll need to measure how much it sticks out from the bottom of the torch.
The stickout is measured as the distance from the front of the cup to the tip of the electrode.
When welding, the stickout should be between ¼ and ½ inch. The stickout should be at most 1.5 times the diameter of the cup. If the stickout is too long, then you won’t be able to angle the electrode into the weld properly and won’t get enough penetration.
Filler rod
To use a torch, hold the torch with one hand and the filler rod in your other hand. Add filler metal a bit at a time with your free hand. This gives you full control over how much filler metal is deposited.
When you angle your filler rod at a 15° angle from the work metal, dip it into the weld pool to deposit filler metal.
There are lots of filler rods to choose from; you’ll need to match the filler rod to the metal you’re using. Some are made for mild steel, stainless steel, and aluminum.
Filler rods come in a variety of diameters, including 3/32” and 1/16”. The thinner ones are better if you’re welding in a tight area, while thicker ones are better if you want to deposit more filler metal. The filler rod diameter will need to match your electrode diameter.
TIG welder
Your power source will be a TIG welder. The TIG torch, TIG pedal, and welding clamp will be connected to it.
DC TIG welding steel, you can use DC electrode negative. When welding aluminum, you can use AC. For full instructions on how to use your TIG welder and settings refer to your TIG machine’s operating manual. Read more about TIG welders and tips for safely using them.
Foot Pedal
The foot pedal connects to the welding machine and regulates the heat. Push down on the pedal when you want more heat, or let it go when you want less. Practice controlling the heat before you jump straight into welding your workpiece. Keep the heat consistent so the weld doesn’t shrink or expand across the joint.
Shielding Gas
The shielding gas will flow through the TIG torch to protect against contamination. Usually when TIG welding you’ll use 100% argon so you won’t be able to use your MIG gas.
Argon/Helium mixture can also be used to help increase heat input and Argon/Hydrogen mixture can also be used but it may result in hydrogen cracking.
Performing the TIG weld
When you’ve set up your equipment, you can start TIG welding. To start the arc, scratch the tungsten, then add filler wire.
Torch movement
This guide can help you learn how to move and position your torch in order to make the best welds possible. You want to be moving the torch toward the direction of the weld at an angle of 10-20 degrees from the vertical. The tilt helps add more material to your weld pool so that you can add filler metal.
TIG welding speed
TIG welding is slower than MIG and stick welding. However, it might seem quicker when you start out as there are many things to focus on! The torch travel speed is about 1mm/second, stopping to add filler metal and take stock of your progress.
If you can find a position where you can rest your hand on the table it will make it a lot steadier.
Feeding the TIG Filler Rods
To get comfortable with TIG welding, try feeding the filler wire through your fingers. The wire can be fed however you like as long as it feels comfortable and your fingers are far from the arc.
Hold the filler wire high up to stop your hand getting burnt by the arc. You’ll need to keep feeding it into the weld pool as it gets shorter. They are easier to handle if they’re cut in half.
Safety
TIG welding doesn’t create sparks or spatter like MIG and stick welding, but the arc still creates dangerous UV light. You need to cover your body with a welding jacket and gloves to protect yourself.
If you use TIG welding, you’ll need to make sure your gloves can allow for greater dexterity so you can effectively feed the filler rod. Make sure you read all of your equipment’s safety guidelines before using it and don’t use this advice as a substitute for anything written in your operating manuals.
that’s all for today!

Manmohan Hebbar
An Industrial Engineer by qualification and a Digital Marketer by profession.
Looking for ways to make money in 2023 by Welding at Home? In This sheet I will show You how I Make $100 per hour! with my Welder.