Stick welding (SMAW or Shielded Metal Arc Welding) is one of the most popular welding processes along with MIG and TIG. It’s a simple procedure that is popular with outdoor welders due to it not being affected by wind – unlike MIG and TIG welding which uses gas cylinders. Our full guide will teach you everything you need to know about stick welding, including how to set up for stick welding, stick welding processes, troubleshooting tips and more.
What is STICK Welding? (SMAW)
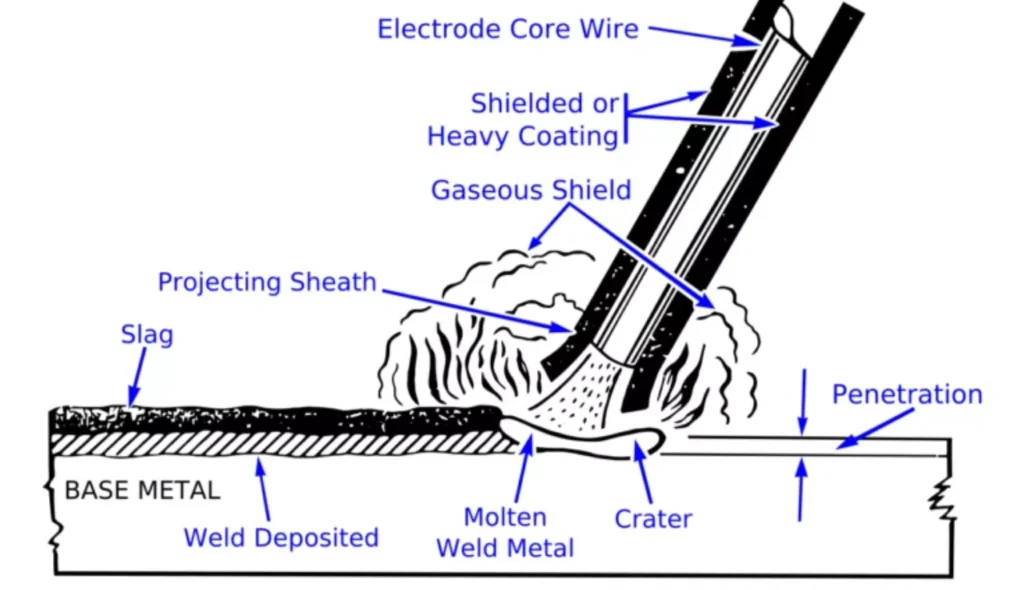
Stick welding is performed by using an electric arc between a metal electrode and the work piece. A current passes through the electrode, melting it into the work piece, forming a weld pool. The electrode is covered in a layer of flux which melts and protects it from contamination by the atmosphere (in the same way a shielding gas protects it in MIG and TIG).
The flux forms a layer of slag on top of the weld bead, which needs to be chipped off and brushed down once the weld is complete.
Advantages of Stick Welding:
- Stick welding is portable. A small stick welder can perform on thick metal and is light enough that you don’t need a gas cylinder, a wire feeder, or any additional equipment.
- It is easier to master than TIG welding, but does require some skill.
- You can weld on metal with mill scale or rust.
- For outdoor projects, stick welding is the best choice. Gas welding won’t produce good results in windy conditions.
Disadvantages of Stick Welding:
- It produces a lot more spatter and slag.
- Increased cleanup time results in decreased efficiency.
- The weld will not be as intricate or high quality as TIG.
- MIG welding requires more skill than TIG because you have to keep the electrode a certain distance from the metal as it burns down.
To Get Started, What You Need?
Safety Equipment:
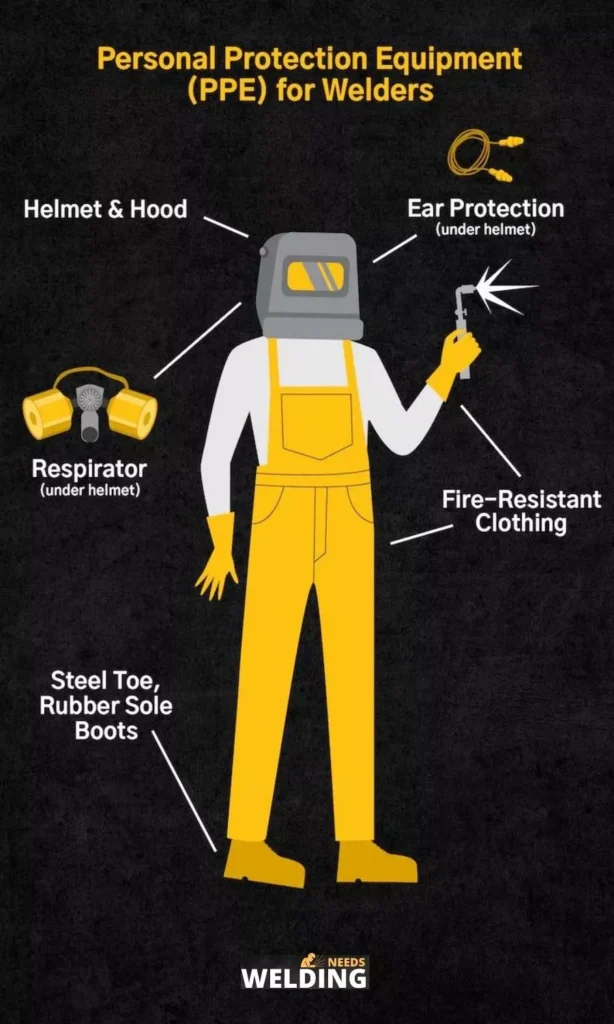
When welding, you must always take great care to ensure your safety. Read and follow all safety information and instructions provided with the manual for any equipment you use when stick welding.
When welding, you will need to wear body protection to protect from the heat and ultraviolet rays. Long sleeved clothing will protect your body, and safety glasses and a welding helmet will protect your head and eyes.
Welding should be performed only when there is adequate ventilation due to the fumes emitted. If you’re outdoors in a breeze, you’ll be fine; if you’re indoors, you need ventilation. An exhaust is the best way of removing fumes from an area.
Stick welder:
Stick welding is a type of welding that requires a stick welder. You can use a multipurpose welder that will let you perform more than one type of welding, for example, MIG, TIG & Stick. Or you can use a stick only welder, which is a lot cheaper.
There are a lot of welders on the market. You can see our full guide on choosing a stick welder for more help on this.
Slag Removing Tools:
Stick welding produces slag over your weld, so you’ll need to clean up the weld after you’ve done it. For this reason, you can use a slag chip and hammer to chip away at the slag, and following this up with a wire brush.
Choosing your Electrode:
There are hundreds of different types of stick electrodes, and you’ll need to choose the right one that matches your welding project. The most popular are 6010, 6011, 6012, 6013, 7014 and 7024 (click here for a comparison of these). When you are working on mild steel, any E60 or E70 electrode will do the job. 7018 are probably the most popular electrode of all these and produce really strong welds but 6013 are a good choice for beginners.
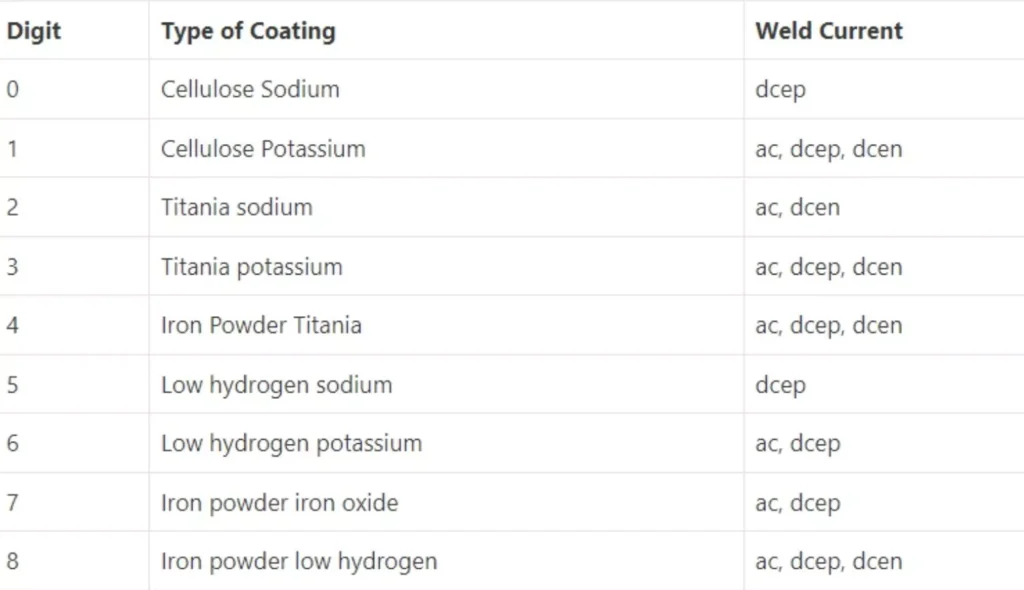
To understand which electrode to choose you need to understand what each of the 4 numbers mean.
- The first two digits show the minimum tensile strength. For example, a 60,000 psi tensile strength electrode will start with 60. This will need to match the base metal strength properties.
- The third digit indicates which positions the electrode can be used when welding. Number one represents the ability to be used in any position, whilst number 2 can only be used in flat position.
- The fourth digit tells you the current that you can use for the electrode, and the coating on the electrode. We have a reference chart for that below.

Looking for ways to make money in 2023 by Welding at Home? In This sheet I will show You how I Make $100 per hour! with my Welder.
Stick Welding Setup
Stick welding is a straightforward procedure that looks something like this image. Remember that your polarity settings will depend on the electrode you’re using, so be sure to double check whether it’s AC/DC-/DC+. To get started try some 6013 electrodes on DCEN with 3/16 inch steel plate.
How to Lay your First Stick Weld
So you’ve set everything up, and now it’s time to get welding. Make sure your settings are all correct, and then get a couple of pieces of scrap metal and place them down as a butt joint. Stick welding requires some skill, so it’s always best to practice first before you try to weld on an actual project.
Striking the Arc
Once the full electrode is in the electrode holder, turn on the welder. To strike an arc, place the tip of the electrode onto the metal and quickly drag it across as if you’re striking a match. If there is an arc formed, lift up your electrode slightly and then you can pull it also from the metal. If the arc cuts out, then you have lifted up your electrode too high from the surface and should lower it back down again. Once your arc is lit it should make a sound like frying bacon if sounds loud and aggressive then you need to turn your amperage down.
Moving the Electrode
One you’ve lit the arc you should move the electrode across the joint to perform the weld. Before you move the electrode you need to have it at the correct angle which is between 15 and 30% to the vertical.
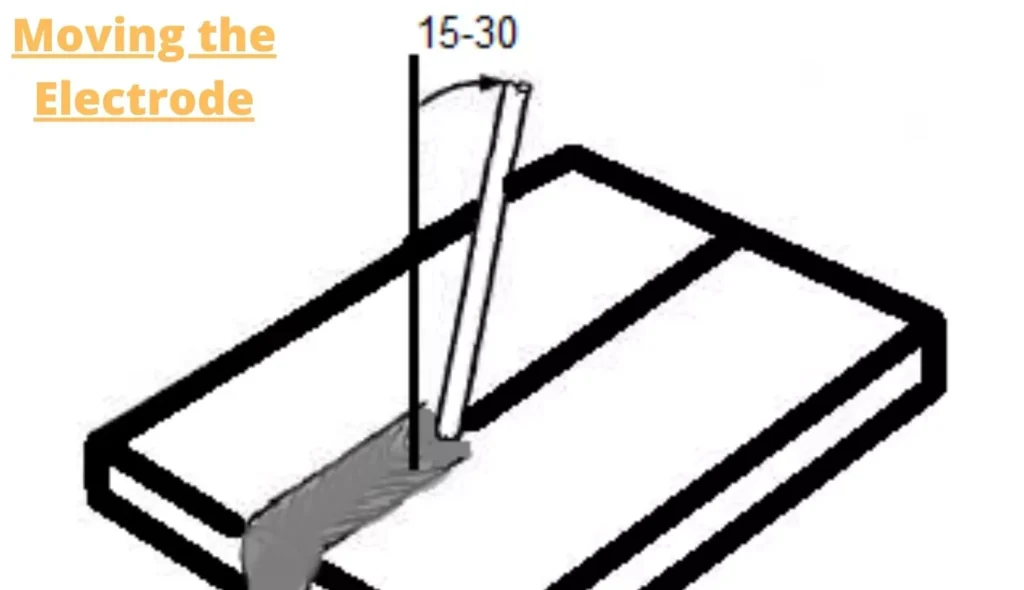
Once you have the electrode at the correct angle, slowly pull it back toward you. You can’t push it because the slag will get trapped in the weld pool and cause porosity. To keep a steady hand, rest your other elbow on the table and hold your hand that’s holding the electrode steady. Test it out a few times and troubleshoot by using the troubleshooting section at the end of this post.
Other Welding Positions
To fillet weld an upside down T weld, adjust the angle to 35% up from horizontal. This is because the weld will start to fall slightly due to the force of gravity if the angle is not adjusted to help push the bead back up against gravity.
The larger the angle of your torch, the more slag you’ll create. If your torch angle is too small and the slag falls into your weld pool, it will cause defects in your welds.
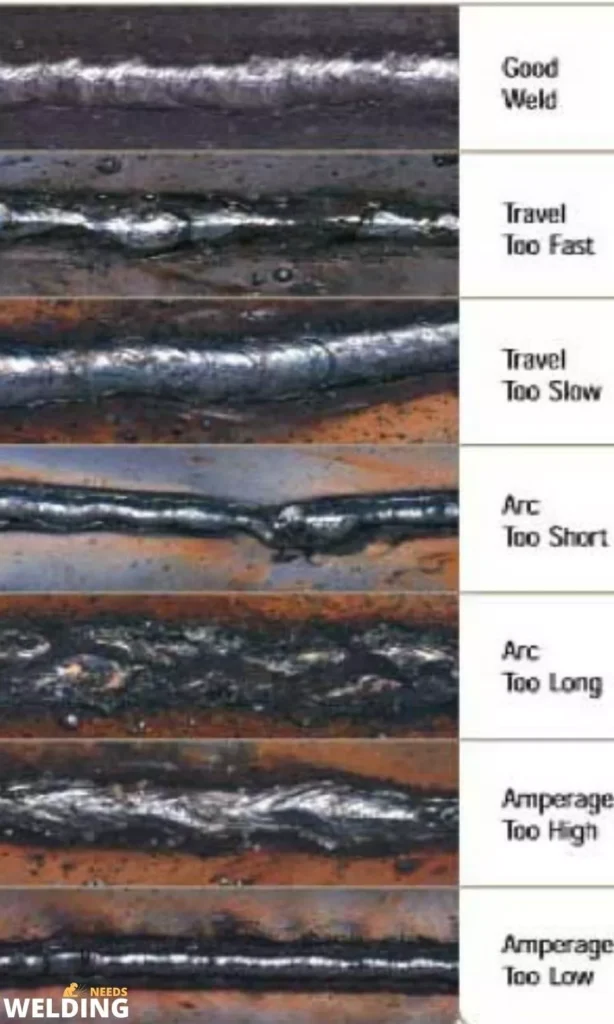
Common Mistakes and Troubleshooting
When you start out stick welding, it’s likely you’ll make some mistakes. The most common mistakes I see are having too long an arc, having the wrong drag angle, welding at the wrong speed and temperature.
Porosity
If you don’t keep the slag at the back of the weld pool by pulling your electrode back at an angle, then slag will mix into the puddle and cause porosity.
Lots of Spatter
Too much spatter is a common problem when you’re welding, and one of the most common causes is having the arc too long. You should hold the electrode only slightly above the work piece, else the arc won’t be able to focus and will jump around erratically instead of being smooth.
If there’s spatter and the arc lets out a loud screeching sound then you’ve probably got the amperage on too high and should turn it down.
Thin Weld Bead
The ideal stick weld bead will be roughly 2.5 times the diameter of the electrode. If the weld is really narrow and you’re welding at a low speed, then it won’t have sufficient penetration. Try slowing down by half the speed that you were initially pulling the electrode and you should see better results.
Undercut
Undercut is having a little crater at the toe of the weld between the weld and the metal plate, which makes the weld weaker. If you have undercut and the weld looks burnt out, try turning the amperage down because it’s too hot.
Lumpy Weld Bead
When you pull the electrode too slowly, the filler metal will pile up and be lumpy. A common cause of this problem is having the amperage too low, which limits penetration and causes the filler metal to just sit on top of the joint.
Trouble Starting Arc
If you have trouble starting the arc, it could be because it’s too cold. To check, turn up the voltage by 15 amps or so and see if it’s easier to start.
We hope you found our guide to stick welding helpful. Please take a moment to rate and share it with your friends and family.

Amelia Darwine
Hey! I'm the founder of Welding Needs®, I decided to set up this website to help you make better decisions about how to weld, what equipment to use, and to provide useful information about choosing a career in welding.
Looking for ways to make money in 2023 by Welding at Home? In This sheet I will show You how I Make $100 per hour! with my Welder.